A blurry picture is a common disappointment that most photographers face. It would be much better if blurry pictures were avoidable, but they are not. So, a photographer has to have a few tips and tricks on how to make a picture clearer.
Not only do photographers need this, but anyone should know how to make a picture clear. In the past, people needed to hire expensive professional editing to get rid of the blurriness. After a few years, people began using Photoshop to remove blurriness.
Photoshop is quite complicated and expensive. The advancement of AI has, however, allowed us to remove picture blurriness in a quick and easy way.
With AI photo editors, you don't need to be an expert in photo editing. You only need a reliable, easy-to-use AI tool to remove blurriness on a picture and make it clearer.
How to Make a Picture Clearer Using Adobe Photoshop
Adobe Photoshop is one of the famous tools that many photographers or editors are familiar with. With this tool, you can remove the blurriness of your photos for free.
However, you can only use this platform on an app. The unfortunate thing about Adobe is that it is not compatible with some Android devices. Therefore, you may need to use the desktop version of it to unblur your photos.
Unsharp Mask Feature
The good thing about Adobe Photoshop is that there are different tools to help you remove picture blurriness. For example, the Unsharp Mask Feature is one of these tools that will help you make your photos clearer.
Here are the steps you may need to use to remove blur using Photoshop;
-
Go to Adobe Photoshop and choose the image by selecting the file, then open it.
-
On the left side of your screen, you will see the layers panel. If you cannot see the panel, click on Windows, then Layers.
-
Right-click the specific layer that has the picture you want to unblur. Select to convert to a bright object.
-
After this, choose the filter, then Sharpen. You can then click on Unsharp Mask.
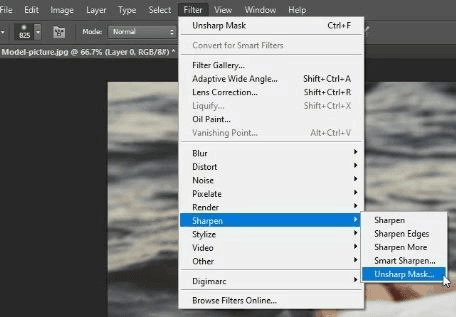

A new window will then pop up, and at this point, you have three other options. These are;
- Amount slide - this option lets you choose the strength of the sharpening effect.
- Radius slider - this option allows users to choose the width of the sharpening effect.
- Threshold slider - this one lets you choose the general effect of the sharpness.
To ensure that you are getting your desired results, you need to check the Preview box. It lets you see the progress of the changes you are making in real-time. If you are not satisfied, you can continue editing the photo.
However, if you are satisfied with what you see, you only need to click Okay.
For more information check out this video by Anthony Morganti.
Photoshop Sharpening EXPLAINED - Unsharp Mask
The Smart Sharpen Tool
Another feature that users can take advantage of is the Smart Sharpen Tool. It has more features than the Unsharp Mask Feature. Both are designed to help you sharpen your photos by the smart sharpen tool is specifically geared towards reducing the noise in low contrast areas.
Here is how you can use the smart sharpen tool to remove blurriness from your photos;
-
Open the photo you want to edit in Photoshop.
-
To duplicate the photo, you need to select the layers panel and click on the image layer. You can then press Ctrl+J.
-
Right-click on the layer you duplicated and select choose to convert to smart object.
-
You can then click on filter > sharpen > smart sharpen. The dialogue box will then open.
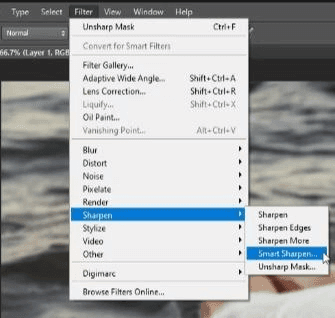
-
On the preset menu, ensure you choose default.

This tool allows you to sharpen your image better by providing more options. The sharpen tab gives you the amount value option and the radius value. The amount value allows you to select the strength of your sharpness, while the radius value gives you the option of choosing the width of the sharpening results.
Still, on this tool, you can remove the motion blur, Gaussian blur and the lens blur.

The highlight and shadow tabs also have more editing options for you. You can play along with the tonal width, fade amount and radius. If you are satisfied with how your photo looks after the edits, you can click Okay.
The Sharpen Tool
This tool allows users to remove blurriness from a photo selectively. For instance, if you want to sharpen some parts of the photo while leaving the rest of the photo with blurriness, you can use this tool.
Beneath the blur tool, you will see the sharpen tool. Click on the sharpen tool. Click and drag only on the areas that you want to remove the blur from. On the menu at the top of your screen, other tools allow you to adjust the brush and adjust how hard the sharpen tool will be.
How Do I Make a Picture Clearer on My iPhone? - Use AI Image Editor
Using Photoshop would be a great option, especially if you are not unblurring lots of photos. The platform only allows you to remove blurriness from one photo at a time.
It may give you a professional look, but you also need to follow the steps above to remove the blurriness from your photos. This may be tiresome to you if you are dealing with many photos.
The good thing about using AI image editors is that you don't have to follow some specific guidelines. You only need to have your blurred photos ready to edit.
You also may not need to download the Ai for editing. You can use your iPhone, visit the AI Image Editor and upload each photo for editing. This usually takes a few minutes because you don't have to follow some set instructions.
How Can I Make a Blurry Picture Clear Using Ai Image Editor?
Just like Photoshop, the AI Image Editor also has different tools that contribute to enhancing the look of your photos and removing blurriness on them. This means that there are many ways how to make a picture more clear using this AI tool.
Here are some of the tools that the Ai Image Editor allows you to use to remove blur from your photos;
Ai Image Upscaler - Overscale
Your photos may not only have blurriness but also other issues, such as low resolution. The Ai Image Editor Upscalling tool not only removes blurriness, but it also takes care of the low resolution of the photos. For instance, if you notice that photos have a low resolution, blurriness and are just unclear, you can use this tool to edit the photos.
The tool uses the power of artificial intelligence to remove blurriness and improve resolution to offer you a bright, revived, high-resolution photo. Unlike Photoshop, you don't have to follow step-by-step guidelines to remove blur from a photo. All you need to do is upload the photo and let the upscaled do its job.
With its easy-to-use interface, you don't need substantial technical knowledge. It is suitable for both beginners and professional gurus. You only need to visit the site, find the upscale tool, upload your photo or a file, and paste photos or paste a URL. You can then click Overscale.
Once the tool is done, you can view the original photo and the edited one. If you are not satisfied with what you get, you can click on Start New and upload fresh photos.
If you are satisfied, you can download the edited photo. This Ai tool also works with cloud computing, which means you can upscale photos using any device. You can also access the site from anywhere and any device.
Imagewith.ai ClearOff
This is another superb tool that you can use to enhance the clarity of your photos using advanced AI technology.
Here's how it can help in removing blur:
-
Advanced AI Technology: ClearOff utilizes advanced AI technology to intelligently analyze images and remove unwanted objects. From its analysis, the tool can quickly help identify blurred or unwanted parts in photos and remove it.
-
Image Sharpness and Clarity: While editing photos Imagewith.ai ClearOff tool maintains the image's sharpness and does not mess up the clarity of the photos while removing unwanted elements such as watermarks. Therefore, you can depend on the tool to enhance the sharpness of your images. This is crucial in reducing the effects of blurriness from photo editing.
-
Powerful Algorithms: the tool also boasts powerful photo editing algorithms to ensure the edited images retain the same level of excellence as your original photos. These Clearoff powerful algorithms may also include deblurring techniques. This eventually improves the overall quality of your images.
Outcut
Imagewith.ai Outcut is another AI image editor tool designed to remove unwanted backgrounds from photos. Many editors might be worried about using background removal tools for their clear photos.
This is because most of these background removers mostly affect photos and introduce blur in photos. Outcut is so different from these other tools. You can highly depend on Outcut to remove the unwanted background from your photos but still maintain your desired image quality.
This is how the tool works;
-
AI Technology: The tool uses advanced AI technology to analyze the images you provide with high precision. This means it can identify and completely remove the background while keeping the main subject in the photo in focus.
-
Incredible Accuracy: The AI technology used by the OutCut tool works with a lot of accuracy. This accuracy ensures that the needed separation between the subject and the unwanted background is precise. This reduces the likelihood of introducing blur to your clear photos.
-
Preserving of Sharpness: The sharpness of a photo is what describes how blurry it is or not. This means that if an image lacks sharpness then it is blurred. Therefore, to remove blur from a photo, you may need to enhance its sharpness. The Outcut tool is designed to maintain the sharpness and clarity of the image. It only focuses on the unwanted background of the photo. This means it does not affect the photo's sharpness, meaning it does not blur a photo while in the background removal process.
What App Makes Images Clear
There are so many apps out there that you can rely on to remove blur from photos. However, some of these apps are not available in some mobile versions. One of these apps is Adobe Photoshop.
It is an excellent app but it might not be compatible with other mobile versions. Therefore, the only way for the app to work is by using a PC version on your browser.
Some of these apps may also introduce other issues on your photos, such as low resolution and watermarks. This is especially true if you are using a free version of a paid app. That means you may get from the photo editing apps, but the end result will mostly have a watermark.
The Ai Image editor does not introduce blur to your originally clear photos. It also does not add watermarks to your photos, which makes it an excellent paid platform.
Final Words
When taking photos, you might come across instances when you shake, thus forcing you to blur on your images. Gone are the days when you had to rely on professional editing skills to remove the blur. These days, you can use AI tools that you can find freely online.
The unfortunate thing about these apps is that you may remove blurriness, but the app might introduce a watermark. The app can also introduce other quality issues on the images.
A common image editor is the Adobe Photoshop editor, but it requires a long process to create clear photos. You need to follow specific instructions before you can completely remove blur from your photos.
Another problem is that Adobe Photoshop only allows you to edit one photo at a time, which takes much time. Fortunately, there are many AI image editors that can help. They allow you to edit one photo at a time, but it only takes a minute or less to gain the needed results. We recommend the high recommend the AI image editor for this.


