In a perfect world, your Image should appear sharp and flawless.
Most professional photographers take Focused, high-quality images. However, mistakes are inevitable, and nothing feels worse than getting home to realize that one of your favorite photos turned out blurry.
Having a blurry photo doesn't mean it's the end.
Thankfully, the latest software like Photoshop and ImageWith.Ai can help fix blurry pictures.
In this guide, I'll walk you through how to unblur a photo in Photoshop.
Keep in mind that only slightly blurred images can be unblurred.
The Unsharp Mask filter idea is the digitalized version of a technique used to sharpen film images in a darkroom.
This effect is available in Photoshop and completed within a few clicks.
The method unblurs the Image by detecting the edges of objects in the Image and then scaling up the contrast between the surrounding area and the thing.
With this method, you'll have some control, but te tool will handle most of the work. This method is a suitable fit for you if you want to unblur your Image without needing a lot of control.
You want the Image to be balanced, so zooming it to 100% entirely is preferable.
If you used a Mac, do this by pressing Command +1. For Windows, press Control+ 1. You'll be able to see the details thoroughly.
Step 1: Change the Image to a "smart object."
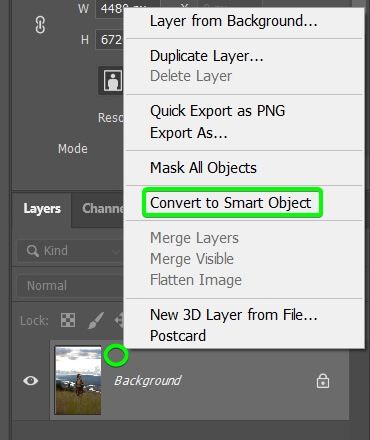
To convert to a bright object, right-click on the Image and select "convert to Smart Object."
The layer becomes an intelligent object when an icon is added to the layer's thumbnail.
Step 2- Use the Unsharp Mask Filter
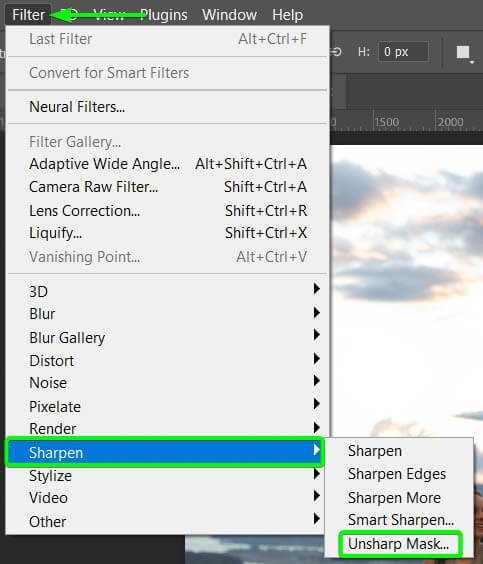
Click on Filter > Sharpen> Unsharpen Mask.
The filter window will now open with a preview video and controls below to manage the filter.
Feel free to move the Image in the preview window to your preferred area where the effects are best visible. Then, adjust the settings to adjust the blur.
Step 3: Set the Amount Slider

This controls the intensity of the sharpening effect. A higher amount increases the contrast between light and dark pixels, intensifying the sharpness. However, excessive amounts can lead to artifacts and an unnatural appearance. For a subtle enhancement, start with a lower amount and gradually increase it until you achieve the desired sharpness.
If you're working with a portrait, a moderate amount (e.g., 50%) can enhance facial details without overly crisping the Image.
If you're a professional photographer or photo editor, you'll know that more doesn't mean better, so adjust the amount slider to a decent rate.
Here, I'll adjust the amount to 60%. Keep in mind that photos differ and will require varying amounts.
Step 4: Set the Radius Slider

This parameter determines the size of the details the filter considers for sharpening. Smaller values focus on finer details, while larger values encompass broader details.
Adjust the radius based on the characteristics of the Image and the extent of blurriness.
A larger radius (e.g., 1.5 pixels) can help bring out the overall details without overemphasizing smaller elements if you have a landscape photo with slight blurring.
A higher number of pixels means the filter will affect more pixels and improve the sharpening effect.
Remember that you shouldn't add too many pixels because it can cause a bad halo effect.
The radius should be set to the point halo effects started and reduce the value to what befits your reputation.
Step 5: Set the Threshold slider
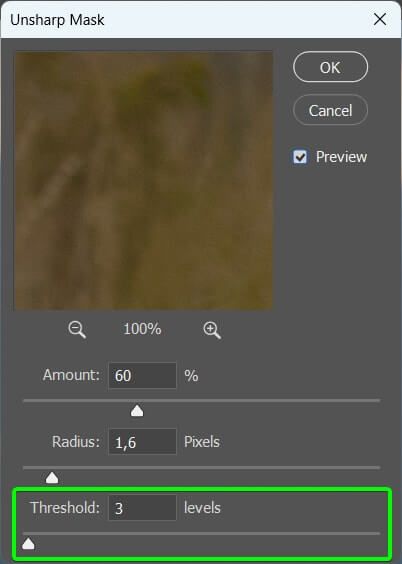
The threshold sets a limit for the filter, ensuring that only significant differences in pixel brightness are sharpened. Higher threshold values prevent the filter from affecting areas with subtle variations. Adjust the threshold to refine the sharpening effect and reduce the impact on smoother regions.
In a photo with a clear subject against a uniform background, a higher threshold (e.g., 10) can preserve the background's smoothness while enhancing the subject's details.
The High number of threshold values lowers the Image's sharpening effect and acts as a balance to both other settings.
Step 6: Adjust the settings to fix the sharpening effect.
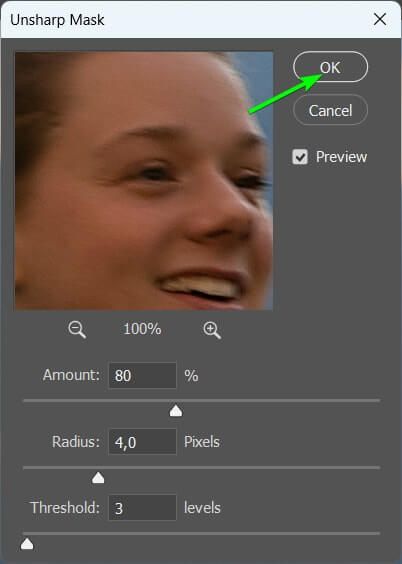
Step 7: Modify The Filter And Check The Results
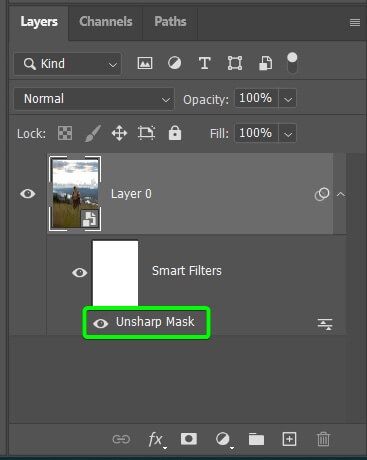
Toggle the preview on and off to compare the sharpened version with the original, ensuring you strike the right balance between sharpness and natural appearance.
When working on a landscape photo with a distant mountain range, preview the changes to ensure that the sharpening doesn't introduce artifacts in the sky or compromise the overall visual harmony.
Step 8: Adjust The Blend Mode To Prevent Color Shifting
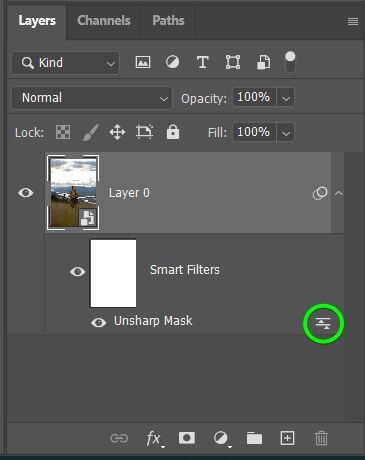
Switching to the 'Overlay' blend mode in a portrait can enhance details without significantly altering the skin tones. This helps maintain a natural and visually pleasing appearance.
Additional Tips for Fixing Blurry Pictures in Photoshop
Blurred images can be a photographer's nightmare, but with Photoshop's right tools and techniques, you can often rescue and enhance those precious moments. In this article, we'll explore additional tips for fixing blurry pictures using advanced methods within Photoshop.
Utilize Layer Masking for Targeted Sharpening
One powerful technique in Photoshop is layer masking, allowing you to apply sharpening to specific parts of an image selectively. Here's how:
Create a Duplicate Layer: Begin by duplicating the image layer to work on a non-destructive copy.
Apply Sharpening: Use tools like Unsharp Mask or other filters to sharpen the entire duplicated layer.
Add a Layer Mask: Now, add a layer mask to the sharpened layer. This introduces a grayscale mask where black conceals and white reveals.
Paint on the Mask: Select a soft brush and paint with black on the mask where you want to hide the sharpening effect. This way, you can target specific areas, such as the subject, without affecting the background.
Exercise Caution When Zooming In
While zooming in allows for detailed adjustments, it's crucial not to get too carried away. Zooming in excessively might exaggerate imperfections that might not be noticeable at regular viewing sizes. Always consider the Image's intended use and find a balance between detailed corrections and overall visual appeal.
Carefully Adjust the Unsharp Mask Settings
The Unsharp Mask filter is a go-to tool for sharpening images, but it demands careful adjustment for optimal results:
Start Conservatively: Begin with conservative settings and gradually increase them. Small adjustments can make a significant difference without introducing artifacts.
Preview Changes: Regularly toggle the 'Preview' option to see real-time changes. This helps you assess the impact on the Image without committing to the adjustments.
Consider Image Characteristics: Tailor the Unsharp Mask settings to the specific characteristics of each photo. For example, a portrait might require different settings than a landscape shot.
Employ Photoshop Plugins for Low-Quality, Highly Blurred Images
For images with extreme blur or low resolution, leveraging specialized Photoshop plugins can be a game-changer:
Research Plugins: Explore reputable plugins designed for handling low-quality, highly blurred images. Some plugins are specifically engineered to address challenges beyond the capabilities of standard Photoshop tools.
Installation and Integration: Follow the plugin's instructions for installation and seamlessly integrate it into your Photoshop workflow.
Fine-Tune Adjustments: Plugins often provide additional controls and settings. Take the time to understand and experiment with these parameters to achieve the best results.
Shake Reduction
Try the Shake Reduction filter if the blur stems from the camera shake (Filter > Sharpen > Shake Reduction). Photoshop analyzes the Image and attempts to correct for minor movements during capture.
High Pass Filter
Duplicate the layer again and apply the High Pass filter (Filter > Other > High Pass). Adjust the radius to enhance details. Change the blending mode to 'Overlay' or 'Soft Light' to integrate the sharpened layer with the original.
Deconvolution
For advanced users, explore the Deconvolution filter (Filter > Sharpen > Deconvolution). This employs mathematical algorithms to restore sharpness. Adjust settings cautiously for optimal results.
Manual Sharpening with Sharpen Tool
Select the Sharpen Tool from the toolbar. Set the brush size and carefully brush over areas needing sharpening. Use this tool judiciously to avoid introducing artifacts or an unnatural appearance.
Using Third-Party Plugins
Investigate third-party plugins designed for image sharpening. These plugins often provide advanced algorithms and additional controls for precise adjustments. Install and integrate them into your Photoshop workflow.
Imagewith.Ai employs advanced algorithms to intelligently upscale images, adding details and clarity even in blurry areas.
Like manual layer masking in Photoshop, image with.ai can automatically identify and selectively sharpen specific regions within an image. This ensures that critical details, such as facial features or important objects, receive priority.
How to Avoid Blurry Images in the Field
Capturing sharp and crisp images is a fundamental goal for photographers. Whether you're a professional or an enthusiast, avoiding blurry images in the field is crucial for producing high-quality photographs. Blurriness can result from various factors, including camera shake, improper focus, or motion blur. Here are essential tips to help you achieve sharp images while out in the field.
Use a Sturdy Tripod
One of the primary causes of blurry images is camera shake, especially in low-light conditions or when using slower shutter speeds. Invest in a sturdy tripod to provide a stable foundation for your camera, minimizing the risk of shaking and ensuring sharper images.
Optimize Shutter Speed
Adjust your shutter speed according to the situation. Faster shutter speeds are crucial for freezing fast-moving subjects, while slower speeds might be acceptable for static scenes. Consider the focal length of your lens – use a shutter speed equal to or faster than the reciprocal of the focal length to avoid blur from camera shake.
Use Image Stabilization (IS) or Vibration Reduction (VR)
If your camera or lens is equipped with image stabilization or vibration reduction technology, make sure to activate it. These features help compensate for minor shakes and movements, which is particularly beneficial when shooting at slower shutter speeds without a tripod.
Precise Autofocus
Ensure your camera is set to the appropriate autofocus mode, whether single-shot or continuous, depending on your subject. Use the center focus point for accuracy, especially in challenging lighting conditions where the camera might struggle to focus.
Manual Focus in Low Light
Switch to manual focus for more control in low-light situations or when shooting subjects with little contrast. Use features like focus peaking (if available) to achieve accurate manual focus.
Maintain a Steady Hand
If shooting handheld, practice good handholding techniques. Hold the camera close to your body, tuck in your elbows, and exhale slowly before pressing the shutter button. This minimizes unintentional movements that could result in blur.
Check Depth of Field (DoF)
Adjust your aperture to control the depth of field. In situations where you want a broader area in focus, use a smaller aperture (higher f-number). This is crucial for landscape photography, where foreground and background details should be sharp.
Prevent Motion Blur
When photographing moving subjects, choose an appropriate shutter speed to freeze the action. Consider panning techniques for dynamic shots, following the movement of your subject with your camera to maintain focus while blurring the background.
Keep Your Gear Clean
Dust or smudges on your lens can compromise image quality. Regularly clean your camera lens and sensor to ensure optimal clarity. Use a blower brush for the lens and follow proper sensor cleaning procedures.
Check Camera Settings
Before shooting, review and adjust your camera settings. Check the ISO to ensure it's appropriate for the lighting conditions, and be mindful of exposure settings to prevent underexposure or overexposure.
Use a Remote or Timer
Minimize camera shake using a remote shutter release or the camera's built-in timer. This is particularly useful for long-exposure shots or situations where pressing the shutter button might introduce shake.
Be Mindful of Environmental Factors
Consider environmental factors that might impact image quality. Strong winds, for instance, can cause a camera shake, while humidity or extreme temperatures can affect equipment performance.
Final Thought
Unblurring an image using Photoshop requires a blend of technical know-how, creativity, and a discerning eye for detail. From leveraging tools like Smart Sharpen and Unsharp Mask to more advanced techniques such as layer masking and deconvolution filters, Photoshop provides a comprehensive toolkit for image enhancement. However,the tool can be complex. Online AI image editor tools like ImageWith can help unblur images.
The ability to carefully adjust settings, preview changes in real-time, and strategically employ different filters makes this tool a unique one. Each step, from duplicating layers for backup to the final adjustments of contrast and saturation, contributes to the delicate balance between restoration and natural aesthetics.


