You’ve taken pictures of your recent camping trip, only to realize when you get home that every image in your camera roll is blurry. Not one picture is crisp and clear. All that precious memory with your family wasn’t captured well on camera. So what do you do?
The first thing you’ll most likely do is search for a professional photo editor who can unblur all of the pictures from your unforgettable weekend. You scramble online to find the best person who can do it at the price you can afford.
But alas, having a professional editor unblur a set of images does not come cheap. And the waiting time? Well, you’ll be lucky to get your pictures done in a week, tops. What’s the next best thing to do? The answer is editing the images yourself.
But how, and can someone who’s never had any photo editing experience do it? The answer is a big yes.
In this article, we’ll show you how anyone can edit pictures using Photoshop, the world’s most popular graphics and photo editing software.
With a few simple steps, you can easily enhance a set of blurry pictures from your weekend camping trip, and turn them into clean, crisp, and beautiful images that capture your unforgettable family outing.
Learn how to unblur an image in Photoshop with this easy, simple, and beginner-friendly guide.
Understanding the Different Kinds of Blur in a Picture
What is a blur in a picture in the first place? A blur is defined as the lack of sharpness in an image. What is this lack of sharpness? Sharpness is defined as a crispness of an image, or how clear the details are.
When details are blurry, you don’t have a picture that perfectly captures the person, object, or landscape, and it does not, therefore, show a true representation of the image captured on camera.
Understanding these things and knowing what causes the blur in a picture, can help you understand how to fix the problem.
And of course, how to prevent it from happening the next time you take pictures, so you won’t end up with blurry pictures of your most memorable experiences, occasions, and life’s precious moments.
Here are 5 different kinds of blurs:
1. Motion Blur
A motion blur happens when the person or object moves at such a rapid speed that the camera fails to get a sharp image, resulting in a blur or streak on the picture.
2. Noise Blur
A noise blur is a grainy appearance on the image caused by a high ISO setting on a camera.
3. Out-of-Focus Blur
An out-of-focus blur is when the background is sharp and clear, while the object you were supposed to capture is blurry. This happens when the camera’s focus is not set properly.
4. Camera Shake Blur
This occurs when you move the camera as the shutter is still open, or your hands are shaky at the point of exposure, leading to a blur.
5. Depth-of-Field Blur
A depth-of-field blur is when the subject is clear, but the background is blurry. This can happen if you move too close to the subject at the time of exposure.
These are just some of the causes of these different kinds of blurs in an image, but other factors can also be at play.
Let’s now proceed to the main section of this article, and that’s how to remove a blur in Photoshop.
How to Unblur an Image in Photoshop: 3 Simple and Easy Methods
Photo editing software and tools like Photoshop are being used by regular folks like you to edit images. In fact, there are over 29 million active users of Photoshop as of 2023, with 90% of creatives using the editing tool for a wide range of photo editing applications.
For this guide, we focused on three simple, beginner-friendly ways you can use Photoshop to unblur images. And these are:
- Using the Shake Reduction Filter
- Using the Unsharp Mask Filter
- Using the Smart Sharpen Filter
Note: Before we proceed with our step-by-step guide, it’s important to note that not all blurry pictures will be enhanced with Photoshop. If you’ve never used the software before, you might find it complicated to use, especially when it comes to turning blurry pictures into completely clear and high-quality images.
For this article, we’ll show you steps that are applicable for slightly blurred photos but are still relatively good in quality.
In other words, this guide is only best applied to fix minor blemishes on blurry pictures like the image you can find at the beginning of this article.
1. Using the Shake Reduction Filter
This filter is Photoshop’s automatic intelligent mechanism that instantly minimizes blurring caused by a camera shake. In our previous section, we talked about the different kinds of blur, and this is the perfect tool to use if the blurriness in your images is caused by shaky hands, or if you moved the camera while taking the picture.
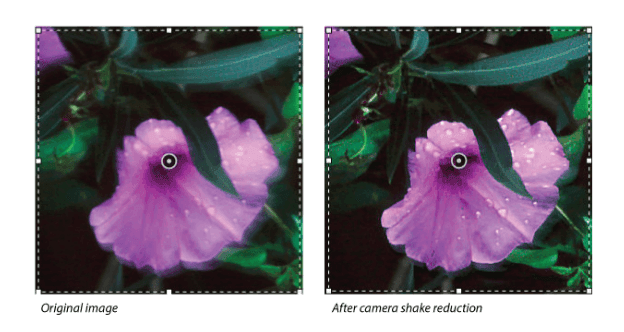
Here are the steps to using the Shake Reduction Filter to unblur an image:
Step 1: Open the image in Photoshop.
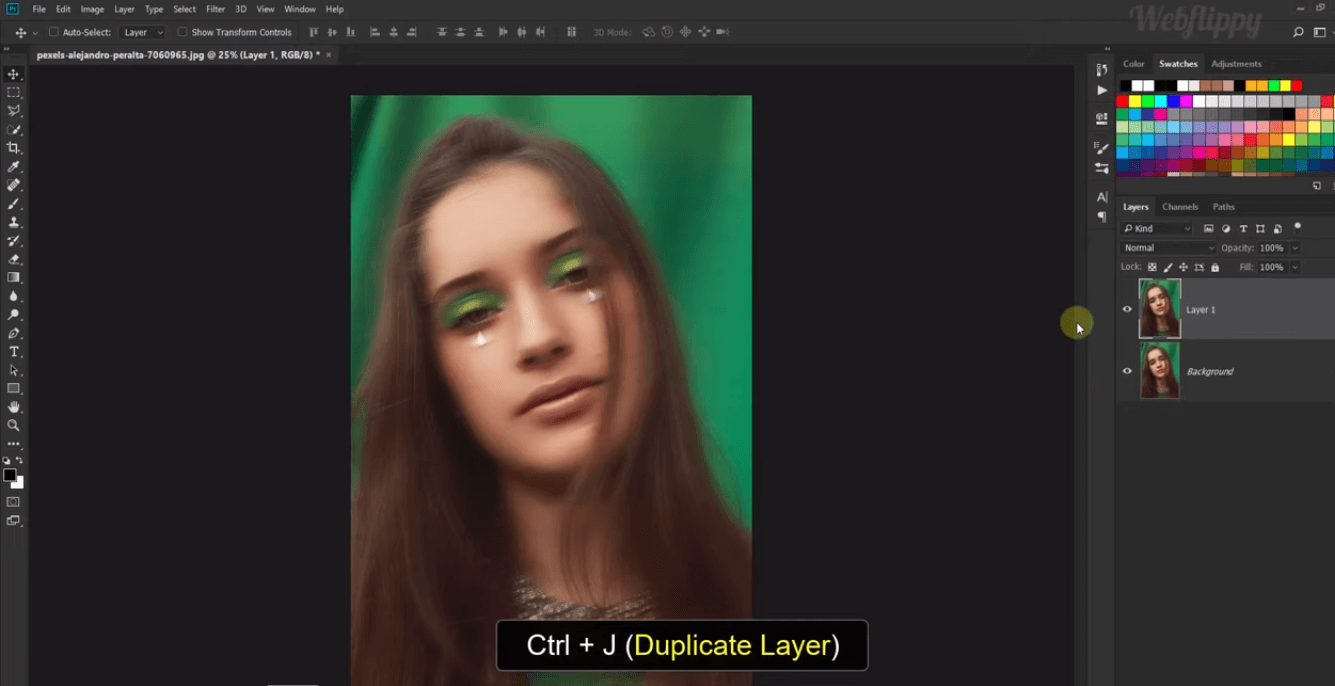
Step 2: Look for the “Layers” panel on the right side of the screen. Click on the image you want to edit, and right-click “Ctrl+J” to duplicate the layer.
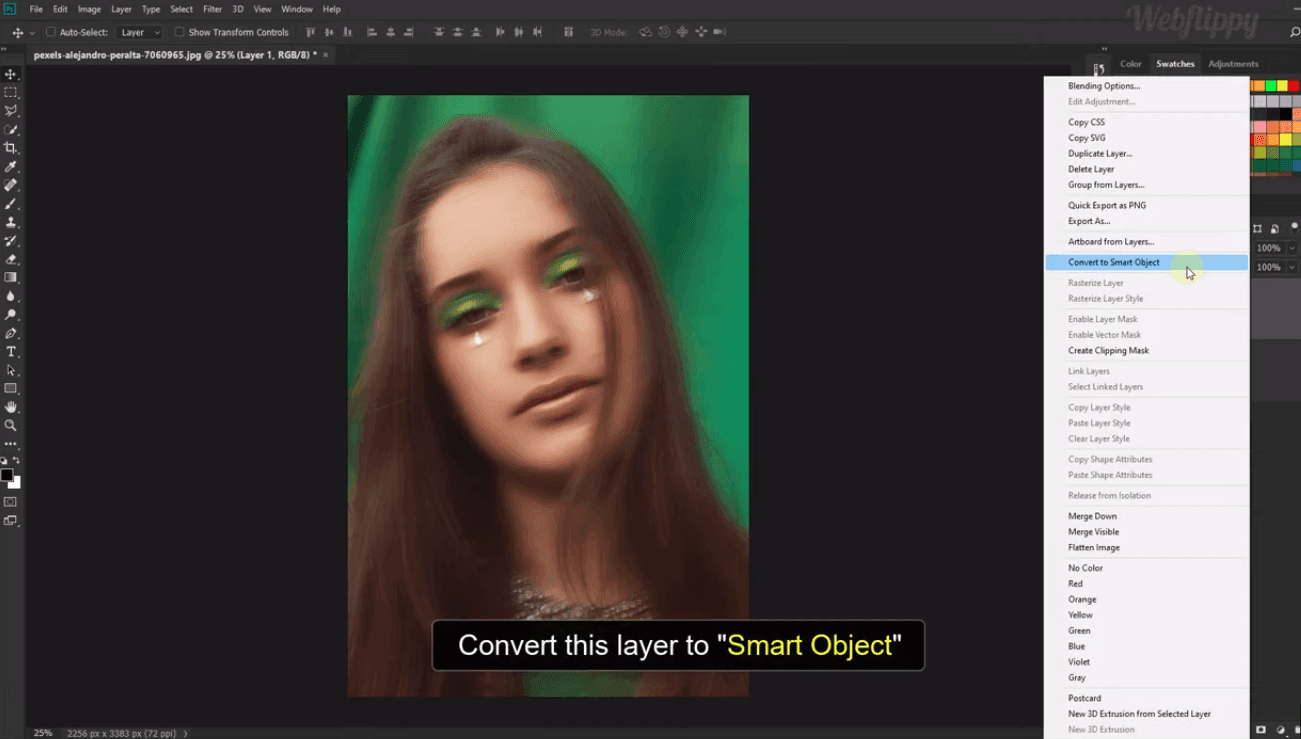
Step 3: Right-click on the duplicated image, and choose “Convert to Smart Object.”
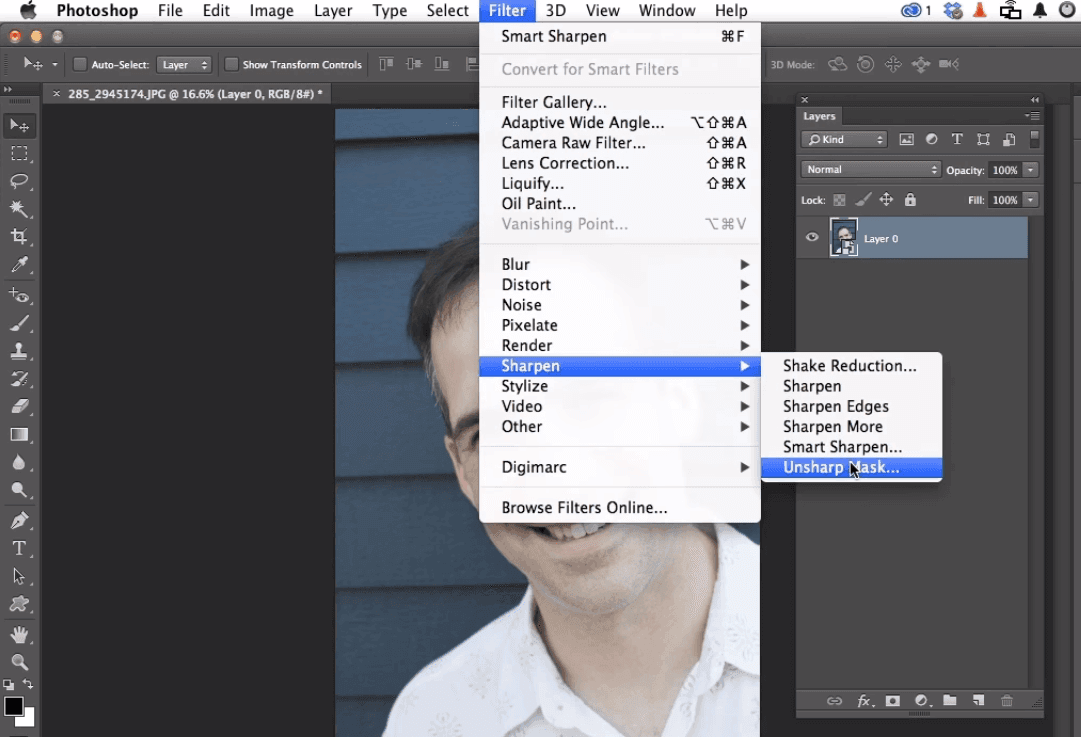
Step 4: Go to “Filters” found on the upper portion of the toolbar.
Step 5: Click on “Sharpen” on the drop-down menu, then click on “Shake Reduction.”
Photoshop will automatically evaluate the sections of the image that need shake reduction. It will also analyze the nature of the blur, and make the necessary corrections to the whole image.
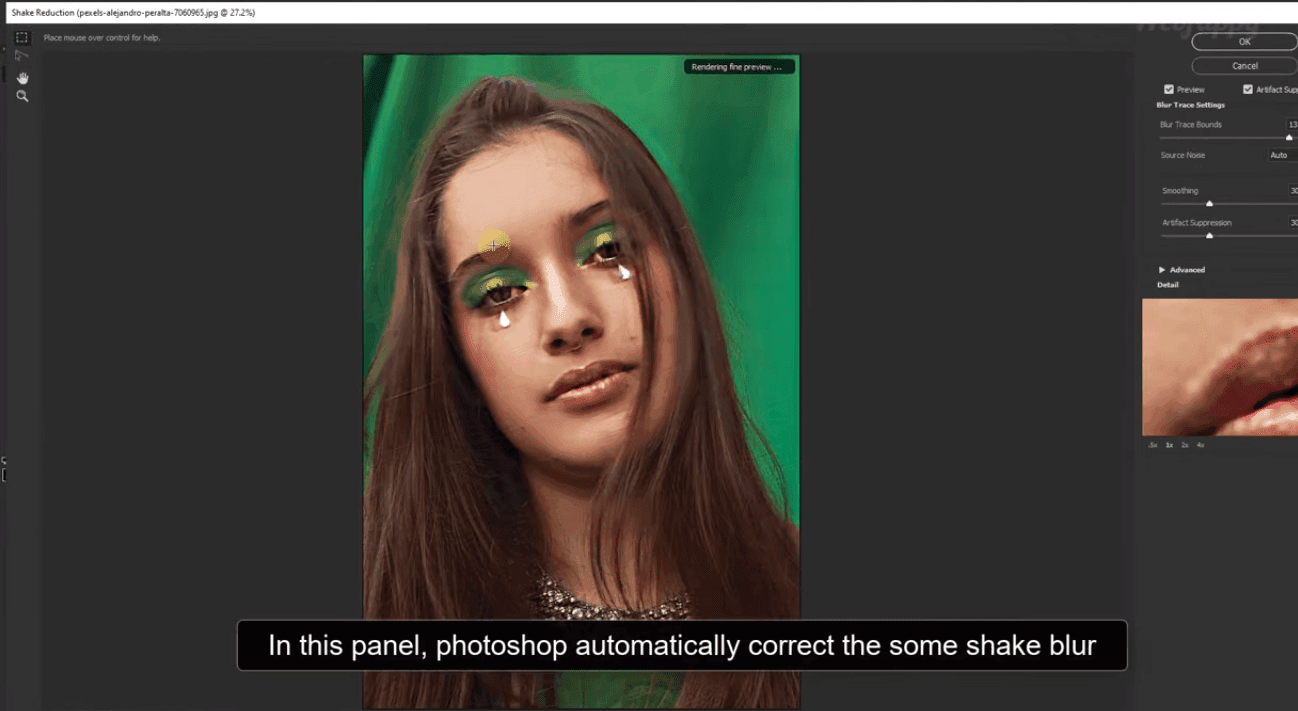
This filter is best used for images that are still sharp but may have low noise or minimal grainy appearances. It is also ideal if you want to unblur the entire image rather than specific or individual regions on the screen.
2. Using the Unsharp Mask Filter
The Unsharp Mask Filter is similar to Smart Sharpen Filter (our 3rd method) but it does not detect edges. Instead, it makes contrasting colors on the image more defined, so you get clearer distinctions between dark and lighter shades on the image.
This means the contrast between the subjects/objects in the picture is softer if that’s what you’re looking for when unblurring your images. But it still does a good job of sharpening specific regions in a picture.
Here are the steps to using the Unsharp Mask Filter to unblur an image in Photoshop:
Step 1: Open the image in Photoshop.
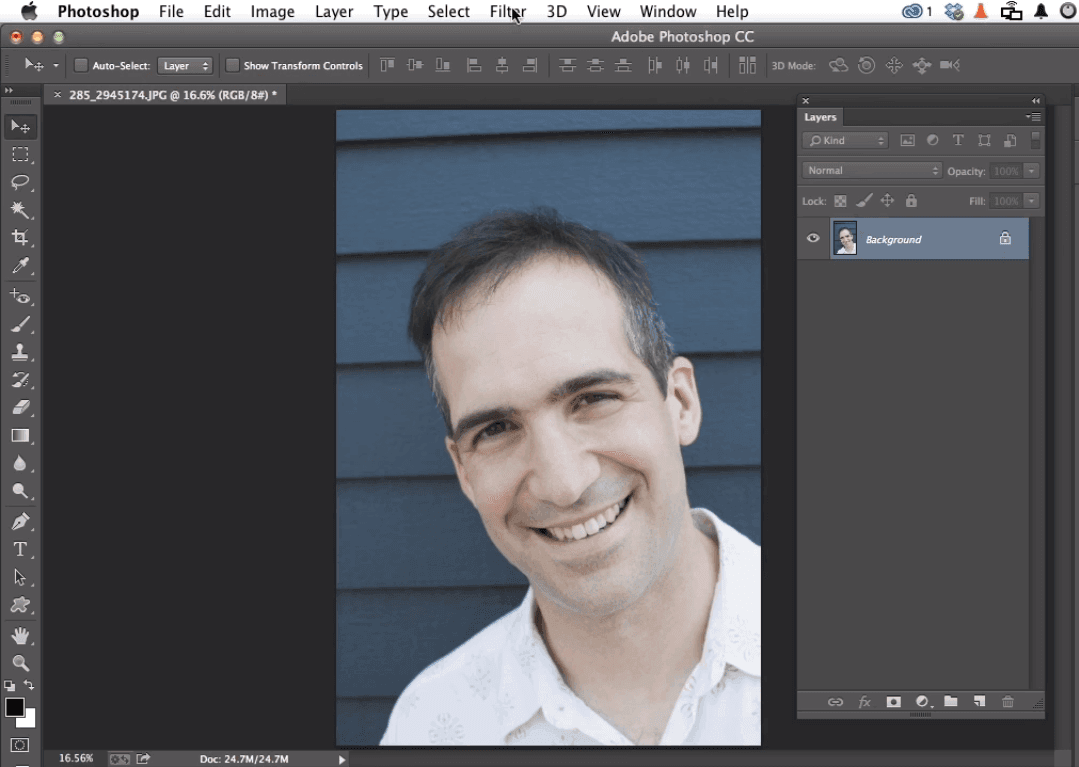
Step 2: Search for the “Layers” panel on the right side of the screen.
Step 3: Click on the image on the panel you want to edit and click “Filter,” followed by “Convert for Smart Filters.” This allows you to use filters to edit the image.
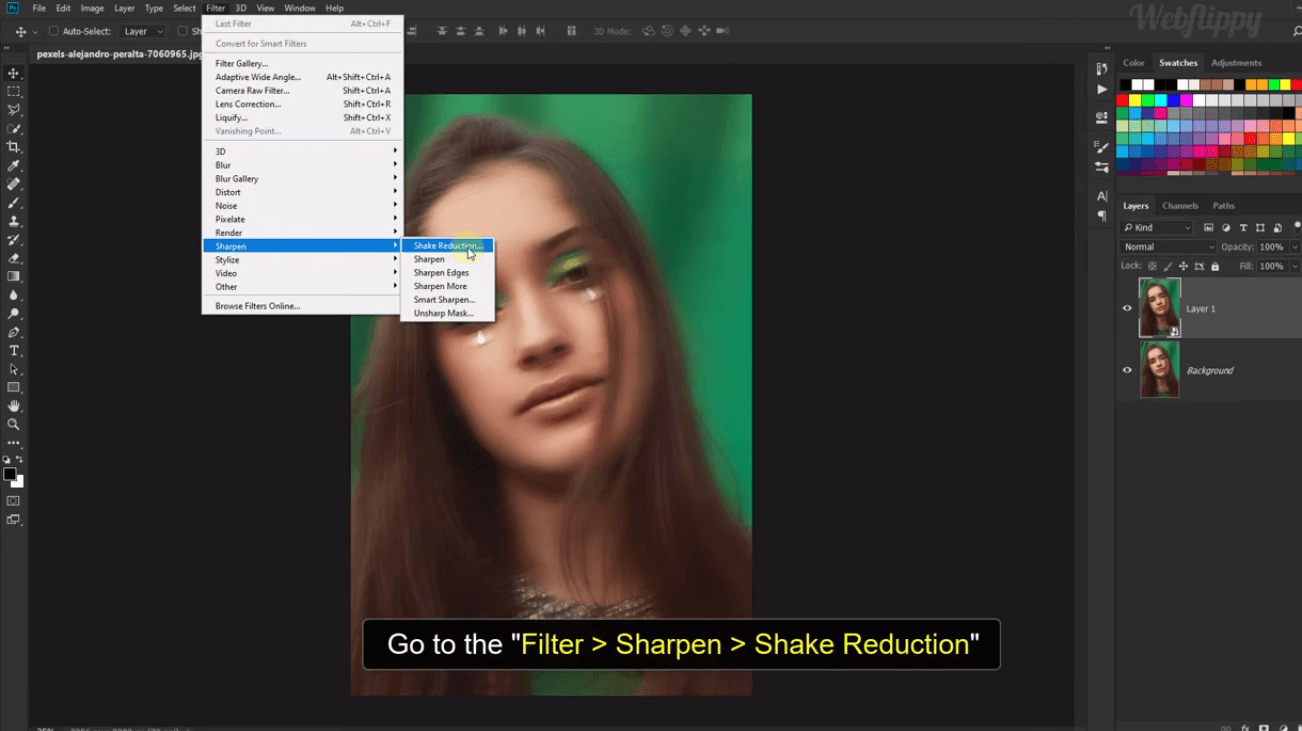
Step 4: Go back to “Filter” on the upper area of the toolbar, click on “Sharpen” on the drop-down menu, then click on “Unsharp Mask.”
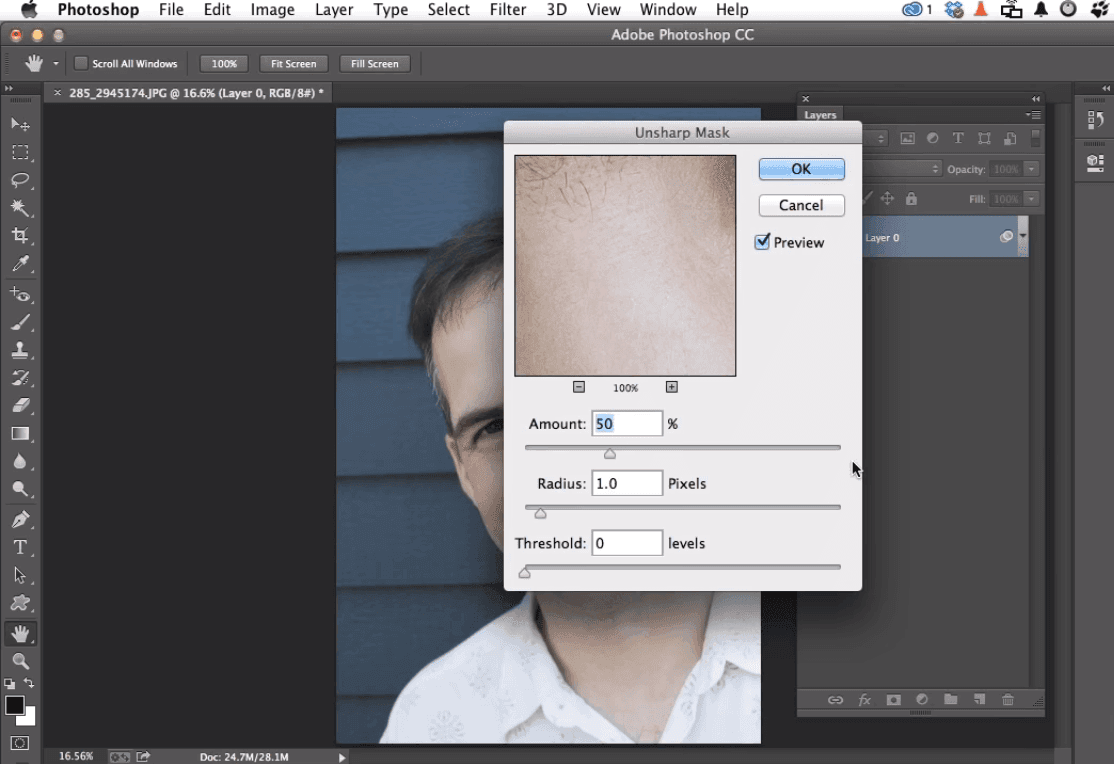
Step 5: A dialogue box will pop up, which lets you manually adjust these three options:
- Amount - The strength of the sharpening effect.
- Radius - The width of the sharpening effect.
- Threshold - The general sharpness of the photo.
You can choose to use the default numbers already filled in the boxes if you don’t want to manually set them up.
To get a real-time view of the changes on your photo, click on “Preview” found in the upper portion of the dialogue box so you can see what your image looks like with the edits.
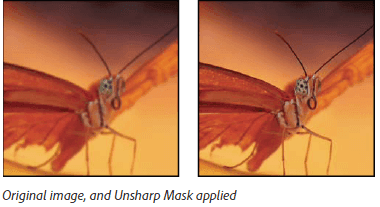
Once you find the perfect adjustments, click OK, and that’s it.
It must be noted that oversharpening an image can make it look like the picture is artificial or too edited. The Unsharp Mask filter is also known for producing a shadow or halo effect if the image is too oversharpened.

3. Using the Smart Sharpen Filter
The Smart Sharpen Filter is ideal for pictures that have specific blurry sections and you only want to unblur that region, and not the whole image.
Sharpening an image means you make the edges of objects more defined. The Smart Sharpen Filter is one of Photoshop’s recent additions to the Sharpen Filter features, and it automatically detects the edges of the subjects and other objects on an image.
What the filter does is it sharpens these edges to make them more defined, therefore, smoothening out the blurry sections between the objects on the image.
Steps to using this filter are similar to the Unsharp Mask Filter, except that instead of clicking on “Unsharp Mask,” you click on “Smart Sharpen.”
Here are the steps for using the Smart Sharpen Filter to unblur an image:
Step 1: Open the image in Photoshop.
Step 2: Search for the “Layer” panel found on the right side of the screen. Click on the image found on the panel, and press “Ctrl + J,” which will duplicate the image.
Step 3: Right-click on the duplicated image, and choose the “Convert to Smart Object” option.
Step 4: Go to “Filter” found on the upper portion of the screen, on the Toolbar. Choose “Sharpen,” on the drop-down menu, then click on “Smart Sharpen.”
A dialogue box will then appear on the screen. You will need to manually adjust the details on the dialogue box depending on what you want to do with the blur on the image.
Step 5: You can use the default percentages if you don’t want to adjust the blur manually. Or, you can also manually put inputs in the tab, which are:
- Amount - How sharp you want the image to be.
- Radius - How wide you want the area to be sharpened.
- Threshold - General sharpness of the photo.
Finding the perfect balance between the options often takes a lot of trial and error, until you get the perfect percentages of the Amount, Radius, and Threshold to get a natural effect on your edited image.
If you’ve never used Photoshop or any photo editing software, we understand it can be a little intimidating to get started. You don’t know the terms used, or the features of the software, and the multiple steps can be challenging for beginners.
That is why there is an alternative option when it comes to removing a blur from an image, and that’s the use of AI photo editors that do all the heavy lifting for you.
In the following section, we’ll show you a revolutionary AI photo editor that can help you unblur an image in mere seconds.
Using an AI Image Editor to Unblur Pictures Versus Removing a Blur in Photoshop
Photoshop is perfect for creative professionals who want to control every detail possible on their pictures, but mastering this photo editing software takes time, patience, and diligence.
If you only want to remove the blur of a set of pictures you took over the weekend, or you have an e-commerce shop with a few items you want to sell, or you’re a creative who wants a fast, simple, and easy-to-use photo editing tool, then what you need is an AI image editor like imagewith.ai that works wonders in mere seconds.

AI photo editors like imagewith.ai unblur images without having to manually select regions in your picture, adjust specific details, and edit pictures through multiple steps.
What is Imagewith.ai?
Imagewith.ai is a revolutionary photo editing software that makes use of advanced and innovative machine-learning processes to remove minor blemishes on an image with just one click.
It makes use of the latest AI algorithms that can enhance pictures, remove unwanted objects, and remove backgrounds in a super fast, easy, and user-friendly way.
Whether you have photo editing skills or not, removing blurs from pictures comes easy breezy with imagewith.ai, and you can use it for free. The AI photo editor allows you to edit up to 5 images per day without costing you a thing, but if you need more, you can choose from different packages that are incredibly easy on the pocket.
Imagewith.ai’s Three Amazing Features
Imagewith.ai offers three incredibly practical features that are perfect for solving the most common problems when it comes to editing the perfect photo.
They use advanced machine learning algorithms that eliminate the need to manually input specific details, as well as do away with having to study and learn complicated features commonly found in photo editing software like Photoshop.
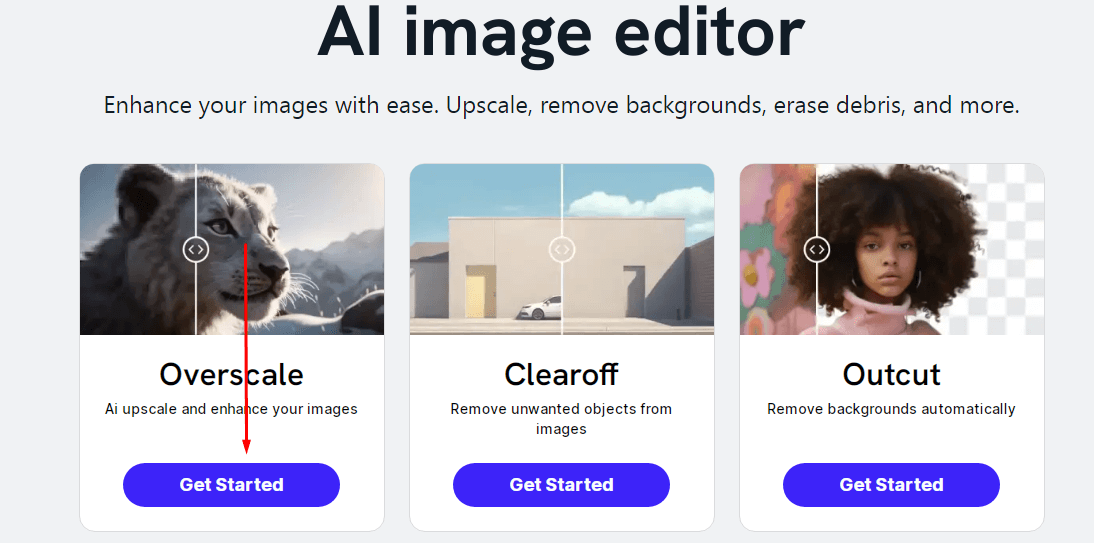
There are currently 3 amazing features of imagewith.ai, and these are:
-
Overscale - Enhances images
-
Clearoff - Removes unwanted objects on the image
-
Outcut - Removes backgrounds
Learning the skills to do these with other photo editing software takes time and a lot of trial and error. But with imagewith.ai’s incredible user-friendly features, there’s no need to sit down and take the time to learn and experiment. All you have to do is upload an image and let the app do the work for you.
Overscale Feature to Remove Blurs and Enhance an Image
It takes multiple steps on to remove a blur from an image on Photoshop, as we’ve revealed in this guide, but you can skip them and take advantage of www.imagewith.ai’s unique Overscale feature.
It instantly enhances any image, removing blurs, sharpening edges, reducing noise blur, and improving the resolution and quality of images but without interfering with crucial details.
The Overscale feature is the ultimate tool to remove blurs and create a cleaner, clearer, and crispier picture without having to use Photoshop or other photo editing software.
Enhancing the picture and removing blurs are done with a cutting-edge AI image sharpener that uses advanced AI techniques, which transforms your low-quality, blurry images, into high-quality, clear pictures.
So how do you do it? We’ll show you the steps on how to unblur an image with www.imagewith.ai.
Steps to Using Imagewith.ai to Unblur a Picture
Here are the steps to using Overscale to unblur an image on imagewith.ai:
Step 1: Go to www.imagewith.ai or download the app.
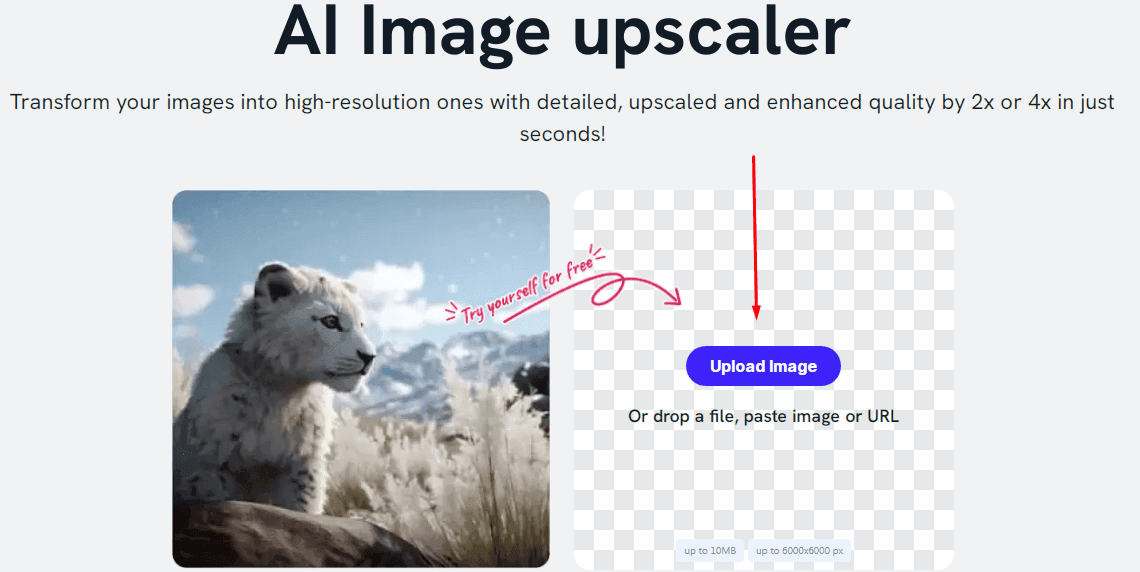
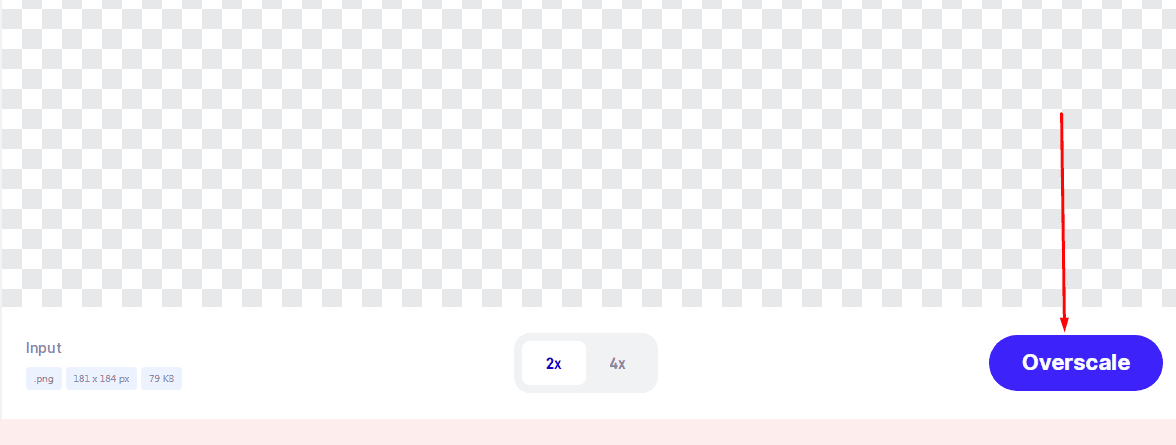
Step 5: An enhanced image will appear beside your original picture, showing you the difference before and after the Ovescale feature is applied.

Editing a blurry picture in Photoshop is possible even for individuals who’ve never edited an image before. Being the most popular photo editing software in the world, Photoshop has the capacity to transform blurry pictures through the use of simple Sharpen filters that remove blurs with a few clicks.
However, if you’ve never worked with Photoshop before, we understand it can be a little intimidating. There are so many features on the software that it can be overwhelming, tasking, and time-consuming to manually remove blurs one by one.
That is why AI photo editors like imagewith.ai are heaven-sent for people who want something fast, easy, and simple when it comes to enhancing a blurry image, especially if that picture holds sentimental value.
Whether you need a simple editing tool for personal use, e-commerce purposes, or even professional use imagewith.ai is a revolutionary and cutting-edge AI photo editor that enhances images with a simple click.
Learn these steps on how to unblur an image in Photoshop if you want great attention to detail and don’t mind the learning curve do it. However, if you want something that’s beginner-friendly, fast, and simple to use, then imagewith.ai’s Overscale feature is your best option to remove blurs from pictures.


